When it comes to wiring a 3 way switch, it can seem like a daunting task for those who are not experienced with electrical work. However, with the right information and a clear understanding of the process, it can actually be quite simple. A 3 way switch allows you to control a light from two different locations, making it a convenient option for rooms with multiple entry points.
Before you begin, it’s important to gather all the necessary tools and materials for the job. This includes wire strippers, a voltage tester, screwdrivers, and of course, the 3 way switches themselves. Once you have everything you need, you can begin the wiring process.
 3 Way Switch Wiring Explained Infoupdate (infoupdate.org)
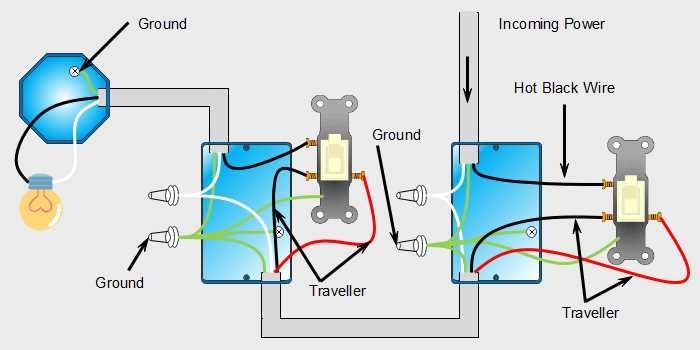
First, you’ll need to identify the power source and the light fixture that you want to control with the 3 way switches. The power source should be connected to the common terminal of one of the switches, while the light fixture should be connected to the common terminal of the other switch. The two remaining terminals on each switch will be connected to each other with traveler wires.
It’s important to follow the wiring diagram for the specific type of 3 way switch you are using, as there are different configurations depending on the manufacturer. Once you have connected all the wires according to the diagram, you can test the switches to ensure they are working properly. If everything is wired correctly, you should be able to control the light from both locations without any issues.
In conclusion, wiring a 3 way switch may seem intimidating at first, but with the right knowledge and tools, it can be a straightforward process. By following a simple wiring diagram and taking your time to ensure each connection is secure, you can successfully install a 3 way switch in your home. Remember to always turn off the power before starting any electrical work and consult a professional if you are unsure about any part of the process.