When it comes to wiring a 3-way switch with power at the light, it involves a slightly different configuration compared to power coming into the switches first. This setup is commonly used in situations where power is fed to the light fixture first, before reaching the switches.
Understanding how to properly wire a 3-way switch with power at the light can be crucial in ensuring that your lighting setup functions correctly. Below is a step-by-step guide on how to wire a 3-way switch with power at the light:
 Two Switch Wiring Diagram (resolutionsforyou.com)
Step 1: Turn Off Power
Before starting any wiring work, make sure to turn off the power to the circuit at the breaker box to prevent any accidents. Use a voltage tester to confirm that the power is off before proceeding with the wiring.
Step 2: Connect the Power Source
Next, connect the power source (black wire) to the black wire leading to the light fixture. Use wire nuts to secure the connections. The white neutral wires should also be connected together using wire nuts, as well as the ground wires.
Step 3: Wiring the Switches
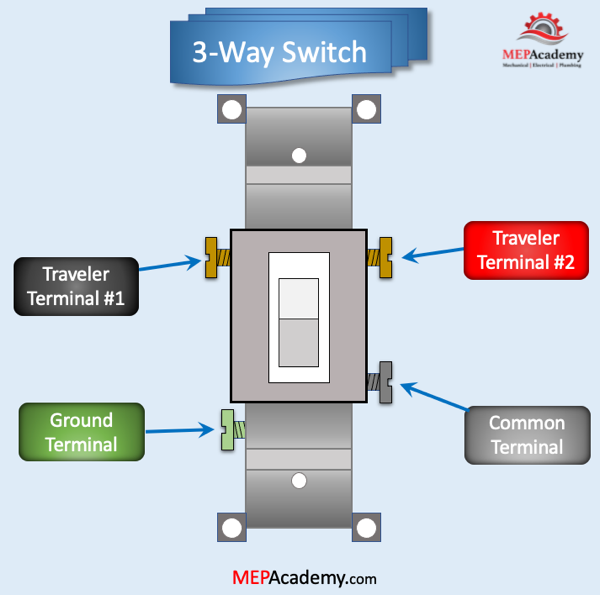
Connect the black wire from the light fixture to the common terminal of the first 3-way switch. Then, connect the white wire from the light fixture to the white wire leading to the second switch. Finally, connect the black wire from the second switch to the common terminal of the first switch.
Step 4: Completing the Circuit
To complete the circuit, connect the traveler wires (usually red and black) between the two switches. Make sure to connect the traveler wires to the corresponding terminals on each switch. Finally, connect the ground wires together and to the switches.
By following these steps, you should have successfully wired a 3-way switch with power at the light. Remember to test the circuit before closing up the switches and light fixture to ensure that everything is working properly.
Overall, understanding the wiring diagram for a 3-way switch with power at the light is essential for any DIY enthusiast looking to tackle electrical projects in their home.