Installing a Lutron dimmer switch can add both style and functionality to your home. These dimmer switches allow you to adjust the brightness of your lights to create the perfect ambiance for any occasion. However, before you can enjoy the benefits of a Lutron dimmer switch, you’ll need to properly wire it into your electrical system.
Here’s a step-by-step guide on how to wire a Lutron dimmer switch:
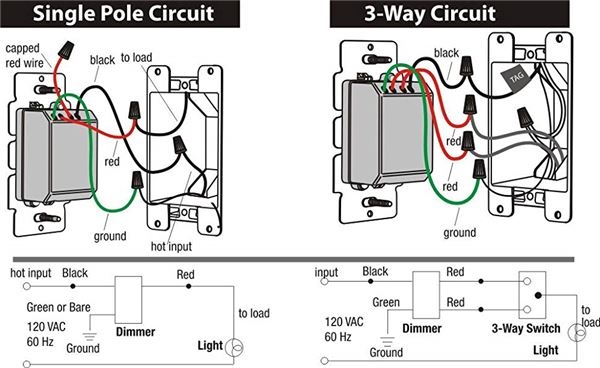
 Step By Step Guide Wiring A Lutron 3 Way Dimmer Switch With Diagram (techschems.com)
Lutron Dimmer Switch Wiring Diagram
1. Turn off the power to the circuit at the breaker box to avoid any electrical shocks or accidents. Use a voltage tester to double-check that the power is off before proceeding with the installation.
2. Remove the existing switch plate and switch from the wall. Unscrew the switch from the electrical box and disconnect the wires from the switch. Take note of which wires are connected to which terminals on the switch for reference.
3. Connect the green ground wire from the dimmer switch to the bare copper or green ground wire in the electrical box. Use a wire nut to secure the connection.
4. Connect the black wire from the dimmer switch to the black wire in the electrical box. Again, use a wire nut to secure the connection. If there is a red wire in the box, connect it to the red wire on the dimmer switch.
5. Carefully tuck the wires back into the electrical box and screw the dimmer switch into place. Attach the switch plate and turn the power back on at the breaker box. Test the dimmer switch to ensure it is working properly.
With these simple steps, you can easily wire a Lutron dimmer switch and enjoy the benefits of customizable lighting in your home. Remember to always follow safety precautions when working with electricity to avoid any accidents or injuries.