Photocells are sensors that detect light and are commonly used in outdoor lighting systems to automatically turn the lights on at dusk and off at dawn. Wiring a photocell is a simple process, but it is important to follow the correct diagram to ensure proper installation and functionality.
Before starting the wiring process, make sure to turn off the power to the lighting system to avoid any accidents. It is also important to check the manufacturer’s instructions for the specific wiring diagram for your photocell model.
 12 Volt Photocell Switch Wiring Diagram Manual E Books Photocell (annawiringdiagram.com)
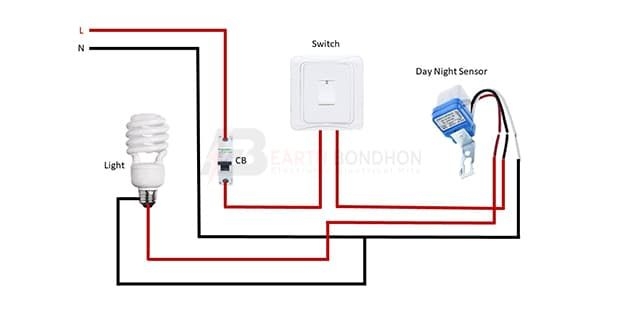
Typically, a photocell has three wires: black, red, and white. The black wire is for power, the red wire is for the load (light fixture), and the white wire is the neutral wire. To wire the photocell, connect the black wire to the hot wire, the red wire to the load wire, and the white wire to the neutral wire.
Once the wires are connected, secure them with wire nuts and electrical tape to ensure a safe and secure connection. It is also recommended to test the photocell by covering it with tape or a cloth to simulate darkness and check if the light turns on.
Finally, make sure to properly mount the photocell in a location where it can detect natural light without any obstructions. This will ensure that the photocell functions properly and turns the lights on and off at the correct times.
Overall, wiring a photocell is a straightforward process that can greatly enhance the functionality and efficiency of outdoor lighting systems. By following the correct wiring diagram and installation steps, you can ensure that your lights are automatically controlled based on the ambient light levels.