When it comes to towing a trailer, having the proper wiring is essential for safety and functionality. One common type of trailer wiring is the seven wire trailer plug, which is used for larger trailers and RVs. Understanding how to wire this plug correctly can help ensure smooth towing experiences and prevent any electrical issues.
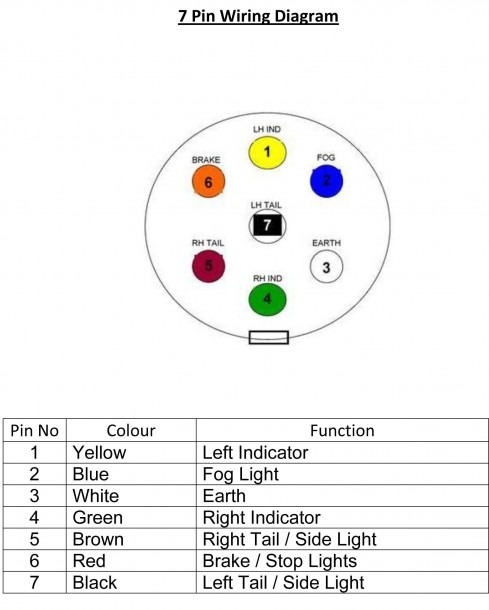
Before getting started with the wiring process, it’s important to have a clear understanding of the color codes for the seven wires. The standard color codes for a seven wire trailer plug are as follows: white for ground, brown for tail lights, yellow for left turn/brake, green for right turn/brake, blue for electric brakes, black for 12V power, and red for reverse lights.
 The Ultimate Guide To 6 Wire Trailer Plug Wiring Diagrams (electraschematics.com)
Now, let’s take a look at how to wire a seven wire trailer plug correctly. Begin by stripping the insulation off the ends of the seven wires, then connect them to their corresponding terminals on the plug. The white wire should be connected to the ground terminal, the brown wire to the tail lights terminal, the yellow wire to the left turn/brake terminal, the green wire to the right turn/brake terminal, the blue wire to the electric brakes terminal, the black wire to the 12V power terminal, and the red wire to the reverse lights terminal.
Once all the wires are connected to their respective terminals, it’s important to secure the connections with electrical tape or heat shrink tubing to prevent any loose connections or exposed wires. Additionally, testing the trailer lights with a vehicle to ensure they are functioning properly is crucial before hitting the road.
In conclusion, understanding how to wire a seven wire trailer plug correctly is essential for safe and efficient towing. By following the standard color codes and properly connecting each wire to its corresponding terminal, you can ensure that your trailer lights work effectively and prevent any potential electrical issues during your travels.