When it comes to installing a doorbell in your home, having a wiring diagram is essential to ensure that everything is connected correctly. A doorbell is a simple device that alerts you when someone is at your door, and having a clear understanding of how to wire it can make the installation process much smoother.
Whether you are replacing an existing doorbell or installing a new one, having a wiring diagram will help you determine where each wire needs to be connected. This can prevent any confusion or mistakes during the installation process, ensuring that your doorbell works properly.
 6 Easy Steps To Wire A Doorbell (www.pinterest.com)
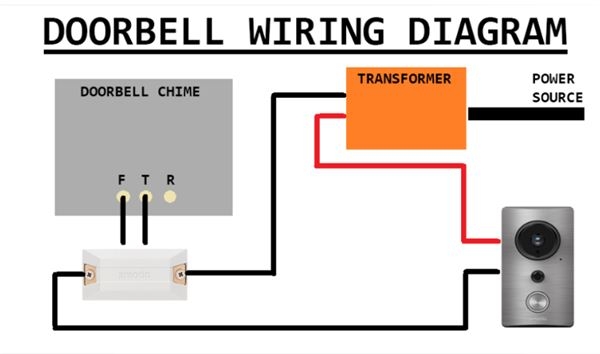
Here is a simple wiring diagram for a doorbell:
1. Begin by turning off the power to the doorbell at the circuit breaker to avoid any electrical accidents.
2. Connect the transformer to the doorbell chime by attaching the two wires to the screw terminals on the chime.
3. Connect the transformer to the doorbell button by attaching the two wires to the screw terminals on the button.
4. Finally, connect the doorbell button to the chime by attaching the two wires to the screw terminals on the chime.
By following this wiring diagram, you can easily install a doorbell in your home without any hassle. Remember to always turn off the power before working with electrical wiring to ensure your safety.
Having a clear understanding of the wiring diagram for a doorbell can make the installation process much easier. By following the steps outlined in the diagram, you can ensure that your doorbell is properly connected and functioning correctly. If you are unsure about any part of the installation process, it is always best to consult a professional electrician to avoid any potential hazards.