When it comes to working on your vehicle’s electrical system, having a clear and accurate wiring diagram is crucial. This is especially true when dealing with components like the starter relay solenoid, which plays a vital role in starting the engine. Without the proper wiring diagram, you could end up causing damage to your vehicle or even risking your safety.
Understanding how the starter relay solenoid works and how it should be wired is essential for any DIY mechanic or car enthusiast. Having a detailed diagram can help you troubleshoot any issues that may arise and ensure that the wiring is done correctly.
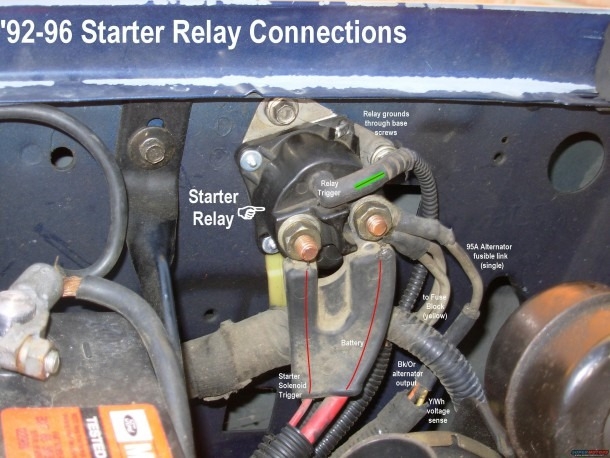
 Solenoid Relay Diagram (www.chanish.org)
Starter Relay Solenoid Wiring Diagram
Here is a typical wiring diagram for a starter relay solenoid:

1. Connect the positive terminal of the battery to the “B” terminal on the solenoid.
2. Connect the starter motor to the “M” terminal on the solenoid.
3. Connect the ignition switch to the “S” terminal on the solenoid.
4. Ground the solenoid by connecting the “G” terminal to a suitable grounding point on the vehicle.
5. Double-check all connections to ensure they are secure and properly insulated to prevent any shorts.
By following this wiring diagram, you can ensure that your starter relay solenoid functions correctly and safely. If you are unsure about any aspect of the wiring, it is always best to consult a professional or refer to your vehicle’s service manual for guidance.
Remember, the starter relay solenoid is a critical component of your vehicle’s electrical system, and proper wiring is essential for it to work efficiently. By using a wiring diagram as a guide, you can avoid costly mistakes and ensure that your vehicle starts smoothly every time.
In conclusion, having a clear and accurate wiring diagram for your starter relay solenoid is essential for maintaining your vehicle’s electrical system. By following the correct wiring procedures, you can ensure that your starter relay solenoid functions properly and avoid any potential issues down the road.