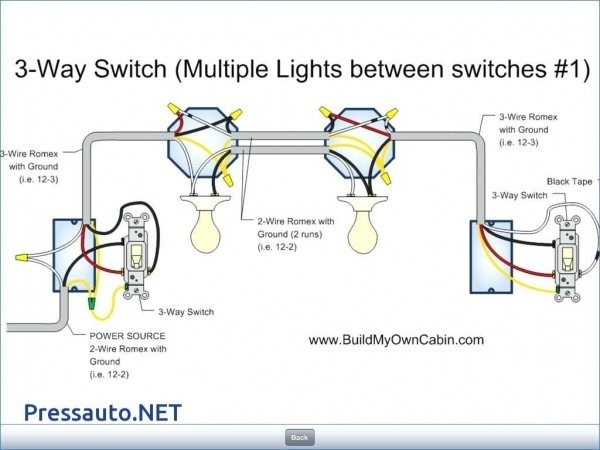
Three way switches are commonly used in homes to control lighting from two different locations. This type of switch allows you to turn the lights on or off from either switch, no matter the position of the other switch. Understanding how to wire a three way switch is essential for any DIY electrician looking to upgrade their home’s lighting system.
When wiring a three way switch, you will need two three way switches and one four way switch. The power source should be at one of the switches, and the light fixture should be connected to the other switch. The switches are connected by three-wire cables, ensuring proper communication between the switches.
 3 Way Switch Wiring Explained MEP Academy (mepacademy.com)
Begin by turning off the power to the circuit at the breaker box. Remove the cover plates from both switches and test the wires with a voltage tester to ensure they are not live. Connect the black or red traveler wires from one switch to the traveler wires on the other switch. Connect the white neutral wires together and the ground wires to the switches and the electrical box.
Once all the wires are connected, secure the switches back into the electrical boxes and attach the cover plates. Turn the power back on at the breaker box and test the switches to ensure they are working correctly. If the lights do not turn on or off properly, double-check the wiring to troubleshoot any issues.
It’s important to follow the proper wiring diagram for a three way switch to ensure the switches work as intended. Incorrect wiring can lead to malfunctioning switches or even electrical hazards. If you are unsure about how to wire a three way switch, consult a professional electrician for assistance.
Overall, understanding how to wire a three way switch is a valuable skill for any homeowner looking to upgrade their lighting system. By following the correct wiring diagram and taking necessary safety precautions, you can successfully install three way switches in your home.