When it comes to controlling a light fixture from two different locations, a 3-way switch is the perfect solution. By using two 3-way switches, you can turn the light on or off from either switch, providing convenience and flexibility. Understanding how to wire 3-way switches is essential for any homeowner looking to update their lighting system.
Wiring a 3-way switch can seem daunting at first, but with the right diagram and a little patience, it can be a straightforward process. In this article, we will discuss the basics of wiring 3-way switches and provide a helpful diagram to guide you through the process.
 3 Way Switch Wiring Diagram Guide (schempro.com)
First, let’s take a look at the components involved in wiring a 3-way switch. You will need two 3-way switches, a few feet of electrical wire, wire connectors, and a screwdriver. It’s important to ensure that the power is turned off at the circuit breaker before beginning any electrical work.
Start by connecting the black wire from the power source to the common terminal of the first 3-way switch. Then, connect the black wire from the light fixture to the common terminal of the second 3-way switch. Next, connect the white wires together and the ground wires together using wire connectors.
Now, connect the travelers – typically red and black wires – from the first switch to the corresponding terminals on the second switch. The travelers allow the switches to communicate with each other and control the flow of electricity to the light fixture. Once all the wires are securely connected, you can turn the power back on and test the switches to ensure they are working properly.
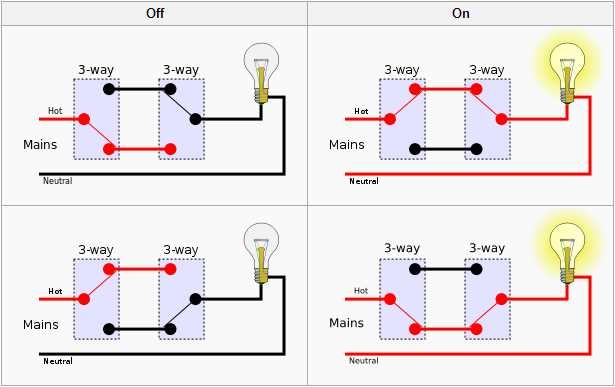
Refer to the diagram below for a visual representation of how to wire 3-way switches:

With the right tools and a clear understanding of the wiring process, installing 3-way switches can be a manageable DIY project. Remember to always prioritize safety when working with electricity and consult a professional if you are unsure about any aspect of the installation.